Important!
All dimensions should have the same and consistence appearance all over a printed drawing:
- The size of the dimension numbers should be 2.5 mm.
- The line weight of the dimension line and the size of the dimension arrows should the same.
- Extension lines (connecting the edges of the object to the dimension line) should be the same.
Almost all CAD software are built with commands that make it easy to apply a consistent dimension appearance. For this purpose, AutoCAD and other design software use Annotative dimension lines. We only need to configure one Dimension Style. Then all dimensions will have the same appearance at all printing scales.
Use the below are values to set-up annatative dimension styles in AUTOCAD. From the menu chose:
-> Dimension Style Manager -> Standard Style -> Modify. Create a new dimension style and name it ''Dimension 2.5 mm''.
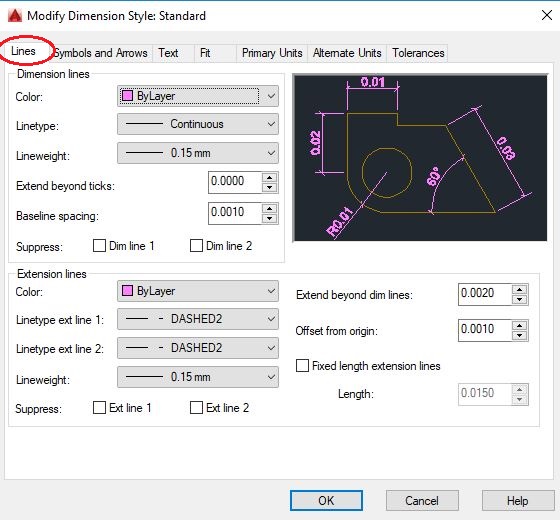
1. Parameters for Tab: Lines

Dimension Lines
- Color: By Layer
- Linetype: Continuous
- Lineweight: 0.15 mm
- Extend beyond ticks: 0.000
- Baseline Spacing: 0.001
Extension Lines
- Color: By Layer
- Linetype ext line 1: DASHED2
- Linetype ext line 1: DASHED2
- Lineweight: 0.15 mm
- Extend beyond dim lines: 0.002
- Offset from origin: 0.001
- Fixed length extension lines: 0.015 (1.5 cm)
For correct printing of extension lines (i.e. dashes of 1.4 mm wide with a space of 0.5 mm between dashes the following configuration is need: Format→ Linetype (Use paper space units for scaling...no tick, Global scale factor…0.0002)
2. Parameters for Tab: Symbols and Arrows

Arrowheads
- First: Arch. Tick
- Second: Arch. Tick
- Leader: Closed filled
- Arrow size: 0.0015
- Center marks: None
- Dimension Break size: 0.004
- Arc length symbol: Preceding dimension text
- Radius jog dimension: Jog angle 45
- Jog height factor: 1.5
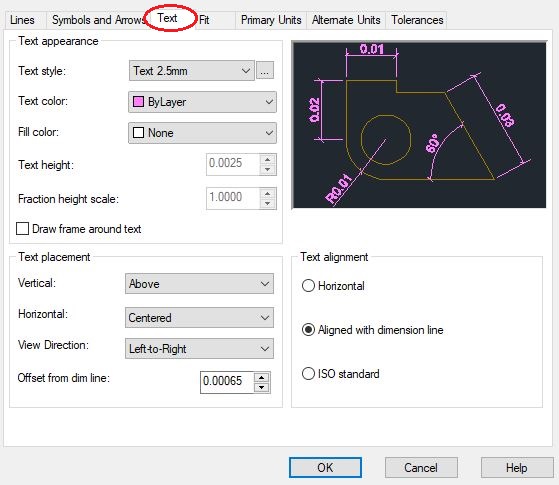
3. Parameters for Text

Text Appearance
- Text style: Text 2.5 mm
- Text color: By Layer
- Fill color: None
- Text Height: (auto by text style)
- Fraction height scale: (auto by text style)
Text Placement
- Vertical: Above Line
- Horizontal: Centered
- View Direction: Left-to-Right
- Offset from dim line: 0.00065 (0.65 mm)
- Text Alignment: Aligned with dimension line
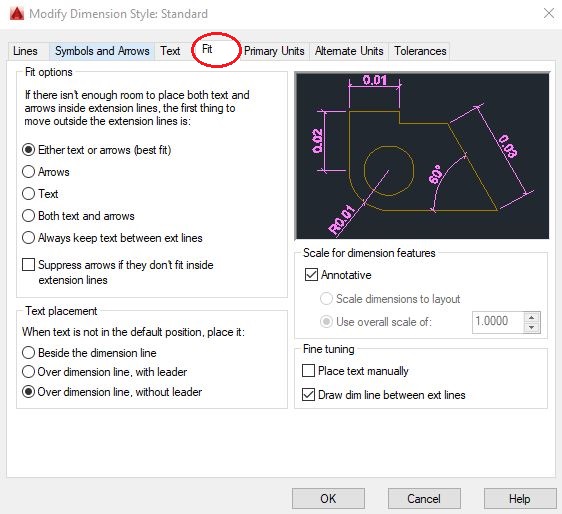
4. Parameters for Fit

- Fit Options: Either the text or the arrows (best fit)
- Text Placement: Over the dimension line, without leader
- Scale for Dimension Features: Annotative
- Fine Tuning: Draw dim line between ext lines.
5. Parameters for Primary Units

- Unit format: Decimal
- Precision: 0.00
- Decimal Separator: ‘.’ (Period)
- Round off: 0.001
- Measurement Scale: Scale factor: 1.0000
- Units format: Decimal Degrees
- Precision: 0
- Zero Suppression: -
6. Parameters for Alternative Units

Alternative Units: None set
Tolerances: None
7. Parameters for Tolerances

- Method: None
- Vertical position: Middle